Monday, July 25, 2011

Fresh Basil Pesto and "Real" Tomato Bruschetta

Well, the bridal shower is over and it was a wonderful success.  I hope to be posting  the shower soon.  Stay tuned!
I have one patio tomato plant with "real" tomatoes, so we have gotten three.   If I buy tomatoes at the grocery store, they aren't "real" to me. They usually aren't deep red, and have no taste.   There's nothing better than locally grown tomatoes, so we usually have to wait for the Farmer's markets.We live in the woods, but decided to try growing a patio tomato in the part of the yard that gets the most sun.  We  actually could grow tomatoes, and the deer didn't eat them. That's a major accomplishment. We also have an herb garden on our patio with lots of basil, besides mint, and rosemary thyme.  To do our three little tomatoes justice, we made fresh basil pesto. My husband wanted his on pasta, and I made bruschetta with mine.
Basil Pesto
Fresh Basil Pesto

2 C fresh basil leaves, rinsed and patted dry
2 large cloves of garlic
1/2 c freshly grated Parmesan cheese
2Tbsp grated Romano cheese
1/4 c walnuts
1/2 extra virgin olive oil
Salt ; pepper to taste

Combine the basil garlic, cheeses, and walnuts in food processor. Process to mix.  With the machine running,  slowly stream in olive oil, add in salt and pepper to taste, and process to desired consistency.  Serve over hot cooked pasta, or make Basil Pesto Bruschetta with garden tomatoes. like I did.
Basil Pesto Bruschetta with Local Tomatoes

Toast a couple of slices of good baguette. Toast until lightly brown. Smear a couple of Tbsp. of fresh basil pesto over bread. Top with fresh, locally grown tomatoes.  Enjoy. The pesto already has cheese in it, so I didn't sprinkle any extra over my Bruschetta!


Friday, July 22, 2011

Raspberry Buckle and a Trip to the Farm with Guest Blogger, Kim@The Farmer's Wife

Hi Everybody! I want to introduce you to my guest Blogger.  I'm busy getting ready for the shower which is tomorrow, so Kim, from the Farmer's Wife, graciously accepted my invitation for Guest Blogger. Kim is a stay at home Mom with  her hubby, and Little Sous Chef, who,have a farm in the Southwest. Kim likes all things green, especially tractors;)  She  is one of my blogging friends that never fails to offer support, encouragement and friendship. Thank you, Kim.  Her recipes are family friendly and down home good, and her little Sous Chef is her toughest critic.  And now here is Kim..
Hey y'all! I'm absolutely thrilled to cook with you today! First things first, let me introduce myself. I'm Kimberly aka The Farmers Wife. I'm a coffeeholic, stay at home Mom and Wife, and yes I am actually married to a Farmer. Being a Farmers Wife makes life all the more interesting, but I love every moment of it. I've never had better produce to cook with in my life, and my Hubby is a wonderful inspiration for me. My little Sous Chef (my son) is also a big part of my life and blog. He is definitely my most challenging little future foodie, he is constantly coming up with ideas for treats he thinks sound good, and he says he "Wants to cook like Mommy someday!". When I first started The Farmers Wife, a couple of years ago, it was because I love to cook, and inventing my own recipes even more, but I was always forgetting to write them down. What started as a hobby, and a resource for myself and family, then turned into something SO much more! I enjoy my "Job" so much, and I love sharing all these goodies with all my friends.

Before I get started on the recipe, I want to say a huge thank you to Becky for giving me this opportunity to guest post on her site! I have enjoyed getting to know Becky over the last few months, and she is just the sweetest thing ever. So when she asked me to guest post for her today I was beyond thrilled!

Now it's no secret we love breakfast foods, It is my go to meal idea when I'm tired and don't want to stand at the stove for hours, breakfast can usually be thrown together fairly easily. Now I wish I could say this recipe was born out of something spectacular, but it wasn't. I had purchased these raspberry's for no good reason. haha! They looked so good, and I wanted them, total impulse buy. I can't even tell you all the ideas that ran through my head trying to decide what to so with these delicious berry's, seriously I was on berry overload. Then it came to me, I love blueberry buckle (for those who don't know it's a coffee cake) but why can't I use a different berry?!? So... I did! And we just loved this. It was so moist, and a perfect blend of sweet and tart. My little sous chef adored it, which is always a good thing. And the Farming Hubby and I thoroughly enjoyed having the leftovers for breakfast the following day. It reheats beautifully in the microwave in just 20 seconds, and that always makes me a happy girl.
Raspberry Buckle

Ingredients:
2 cup All Purpose Flour
2 1/2 teaspoons Baking Powder
1/4 teaspoon Salt
1/2 teaspoon Cinnamon
1/4 teaspoon Nutmeg
Pinch of Cloves
1/2 cup Shortening
3/4 cup Sugar
1 Egg
1/2 cup Buttermilk
2 cups fresh or frozen Raspberries (can also be made with blueberries, or blackberries)

Topping:
1/2 cup All Purpose Flour
1/2 cup Sugar
1/2 teaspoon Cinnamon
1/4 cup Butter or Margarine

Directions:
Preheat your oven to 350F degrees, and grease a 9x9x2 or 8x8x2 in. square pan, set aside. In a medium bowl, combine flour, baking powder, salt and spices; set aside. In your mixer, beat the shortening on medium speed for 30 seconds, then add in the sugar. Beat on medium to high speed until fluffy. Add in the egg, and beat well. Add in the flour mixture and buttermilk in increments, alternating them until fully incorporated. Pour the batter into your greased baking dish, and spread evenly. Sprinkle your berries on top of the batter. In a medium bowl, mix your topping mixture and using a pastry blender or a fork, cut in the butter until mixture resembles coarse crumbs. Sprinkle that on top of the berries, and bake for 50-60 minutes, or til golden. Serve warm.

Review:
I always do a review at the end of my recipes as to whether or not I will make this again. This is a simple, yet impressive coffee cake, one that is versatile to your tastes in berries, or to whatever you can find easily in your local store. We really enjoyed this for both dinner and breakfast the next morning, and the raspberries had a great sweetness to them from the topping. 4 stars.


Did you enjoy your trip to the farm?  Thank you so much Kim. for sharing this fabulous breakfast treat.  Hop on over to Kim's blog and tell her that Becky sent you. I have never made a "buckle" before, but I have made plenty of fruit crisps. I'll be making this buckle after the shower, and when it cools off. 
You can find Kim @The Farmer's Wife, Facebook, and Twitter.
Thanks Kim for being my Guest Blogger!!!
Have a great weekend!


Saturday, July 16, 2011

Frozen Mojitos-A Last resort

My husband decided that we needed to replace the carpeting in our guest room and our den, now! I am in the midst of preparing for a bridal shower for my future daughter-in-law in one week, and up to my ears in cupcakes and baking. At least I'm not having the shower at my house. but this couldn't be a worse time for me to have the carpeting replaced.  Thank goodness I could still use my kitchen. 

So when your house looks like the picture above you bake...
 Nutella Fudge Brownie Bites .  I made these for the first time, and have made them several times since.  They will sit proudly on the dessert table of the shower, with many other mini desserts that I am baking. I will be posting those desserts at a later time.

After you have made these brownie bites, what else can you do?
 You make a Frozen Mojito.  For those of you that haven't had a Mojito, it's a Cuban highball. They are a wonderful concoction of white rum, fresh mint, lime juice, sugar and sparkling water or club soda. This drink is so refreshing, with the citrus, the soothing mint, the sweetness of the sugar, and the kick of the rum,  Nothing could be more refreshing than a Mojito, on a hot summer day!

As fate would have it, when I went to take the picture of this luscious Mojito, the battery had to be recharged in my camera. Then I had to put the Mojito in the freezer, for abour 30 min, until I could take pictures.  Voila, the Frozen Mojito was born, or my version anyway. I used the Bacardi recipe, but they have a really cool website Bacardi Mojito.  check it out. Now I didn't have a muddler, but I did have this...
 a wooden juicer, that has a rounded bottom, perfect to muddle mint leaves with the sugar to release the oils from the mint leaves. If you already have a muddler, fine, but you can use this wooden juicer, also. I didn't use Bacardi Rum, either, Shhh, don't tell. Here is the recipe, if you didn't go to the Mojito link.
 Mojitos
1.5 oz  White rum Rum
12 fresh spearmint leaves
1/2 lime, juiced
7 oz club soda or sparkling water
2 tbsp. simple syrup
(or 4 tsp. sugar) 
I used Splenda
about 2 tsp.

 Muddle, or crush mint leaves, sugar or simple syrup, and lime juice together in a tall, narrow glass. Add ice. Then add rum and sparkling water over ice cubes  Stir well and garnish with lime slices and more Mint.  Enjoy !

If you want a frozen Mojito, put the Mojito in the freezzer, if you can wait, for about 30 min, and then Enjoy! Transform youself onto a brezzy, tropical Island!


Wednesday, July 13, 2011

Tuna Egg Salad on a Bed of Spinach, A Cool Comfort Food for a Hot Day!

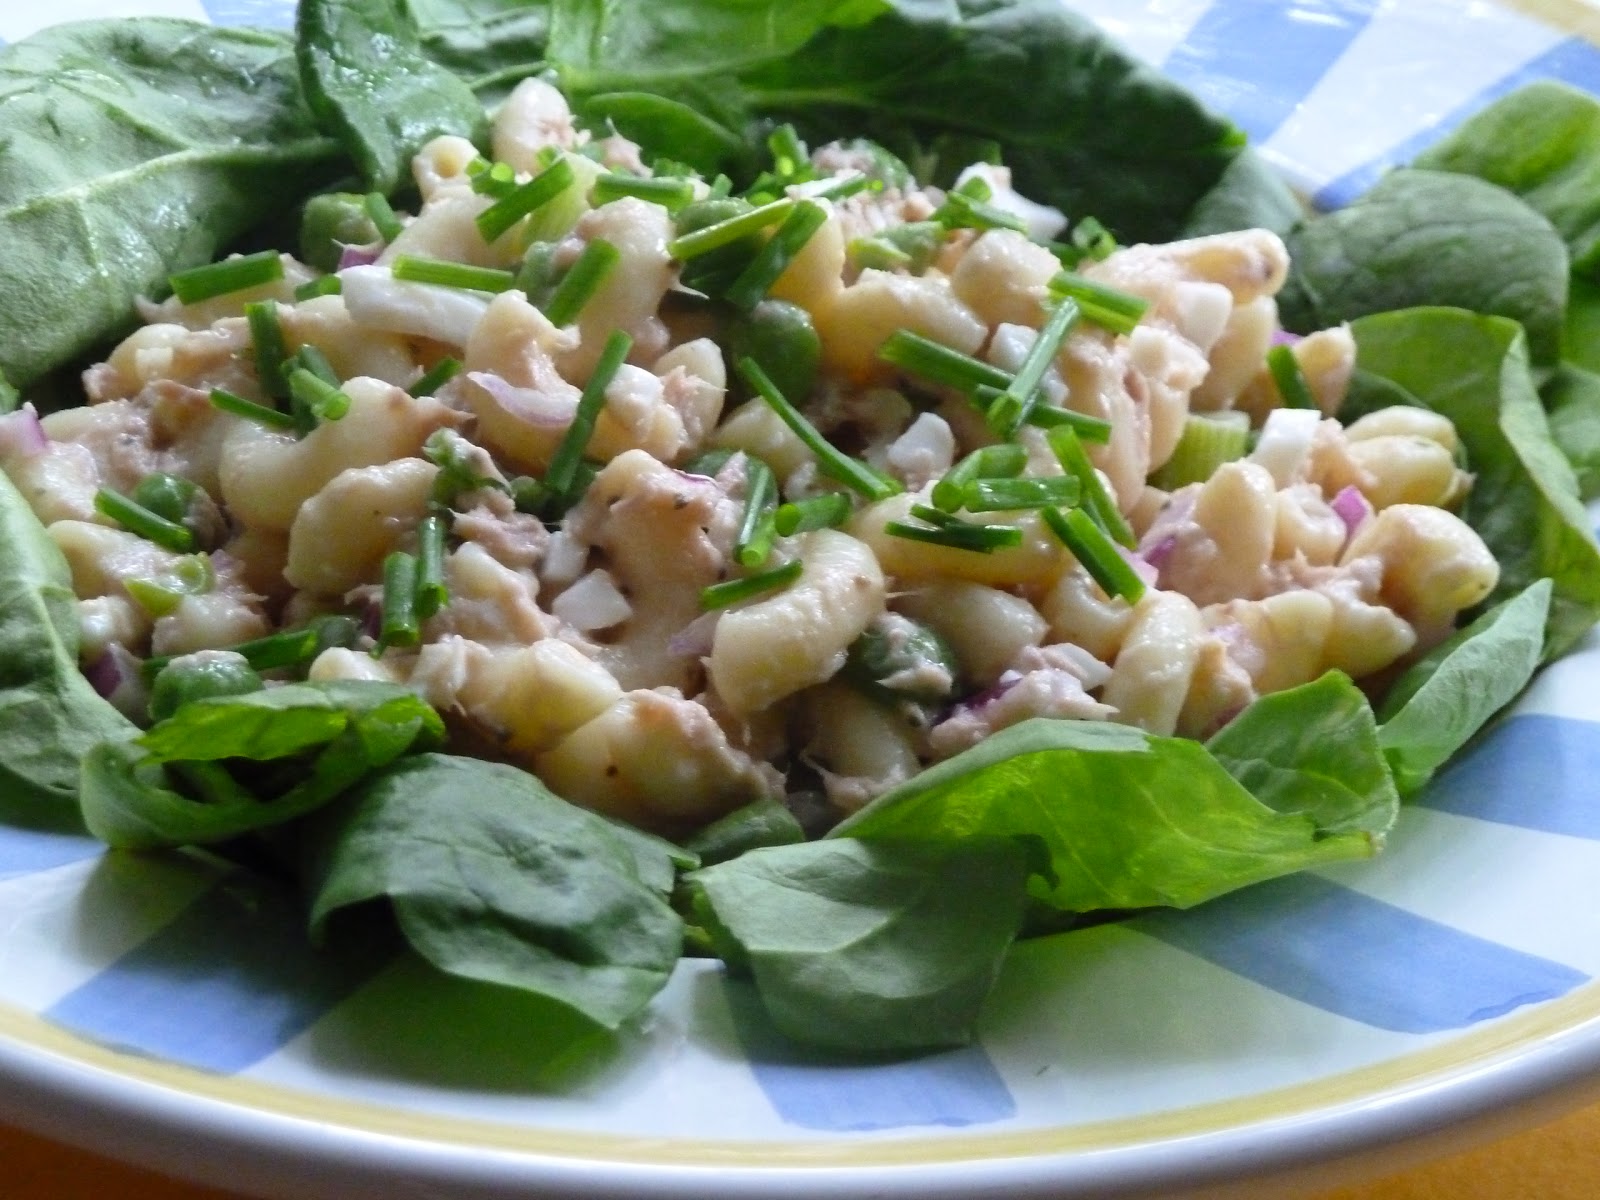
When you think of comfort food, do you think of steaming bowls of soup or stews,  hot casseroles, or plates of pasta? To me this Tuna Egg Salad is comfort food.  What could be better on a 90 degree, 100% humidity day, than a chilled bowl filled with this Tuna Egg Salad? Nothing, I don't think, except maybe a bowl of ice cream. I am from the generation that grew up without air conditioning, not in the house or the car, for many years. Can you imagine that? When you only have fans to keep cool, you don't want to eat hot food.  You want chilled Tuna Egg Salad, ice cream, popsicles. You get get my drift. To this day, I still can't eat hot food in hot weather, even in the air conditioning. This drives my husband crazy.  He wants pasta and grilled food. I eat a lot of salads and cold watermelon and yogurt, When we have stretches of hot weather, like we are having now in Chicago.

This Tuna Egg Salad is packed full of Tuna, cold pasta, hard boiled eggs, cooked green peas, fresh chives from my herb garden, Miracle Whip, ( I don't like mayonnaise)  and a squeeze of lime.  Have you had Tuna salad with a squeeze of lime?  Try it!  The lime gives the salad a little zing.

Are you a Mayonnaise or Miracle Whip person?  Maybe because I grew up on Miracle Whip, that I don't like Mayonnaise. Next time, I'll have to try subbing Greek yogurt for some of the Miracle Whip.  Have any of you done that? Anyway, here is the recipe, and you can adapt it ay way you choose.

Tuna Egg Salad

2-5 or 6 oz cans of tuna
8 oz pasta, cooked, drained, or chilled I used elbow macaroni, but you can use farfalle, rotini, or any pasta of your choice.
4 eggs, hard boiled, and sliced
1 c of cooked green peas
1/2 -3/4 c of Miracle whip or Mayonnaise to moisten
Juice of 1 lime
1 tsp. of celery seed, or 1/2 c chopped celery
Fresh chives, green or red onion sliced
Fresh Baby Spinach or lettuce of your choice

Assemble all of the ingredients, except for the Baby Spinach  in a large bowl.  Thoroughly combine, and chill in refrigerator.Chill serving plates or bowls.  At serving time, line  chilled plate or bowl with Baby Spinach, and top with the chilled Tuna, Egg Salad.  This  salad in even better the next day, if you have any leftovers. Enjoy!

Monday, July 11, 2011

Mini Key Lime Upside Down Tarts


I have been baking and freezing like crazy for the upcoming shower that I am co-hosting for my future daughter-in-law July 23rd.  I don't want to give too much away, but instead of one big cake, we are having mini desserts and of course, cupcakes.  One of the cupcakes requested by the Bride-to -be is Key Lime Cupcake, which will be posted later.  After I made the Mini Key Lime Cupcakes, I had some of the Key Lime Mixture left over.  What to do with it?  I certainly couldn't waste it, but I didn't have enough to make the Key Lime Pie, so I made Mini Key Lime Tarts with the graham cracker crust on the top,  just perfect for my little ramekins.   Now if you are are thinking, that the custard isn't green, well key limes are green on the outside, but not on the inside, and the juice isn't green. So if you have a piece of Key Lime pie and it's light green, food coloring has been added to it.

" Graham The recipe is easy peasy, I love that new term, especially for summer:), if you have the right ingredients. The main ingredient that you need is this, Nellie and Joe's Famous Key West Lime juice,  available in may grocery stores, and specialty shops. The recipe is on the bottle. Besides the Key Lime Juice, all you need is 1can of sweetened condensed milk,  3 yolks, and a graham cracker crust, either pre-made or made from scratch. When I made my tarts, I baked them first in the ramekins, and just made a small amount of graham cracker crust in a small pie pan, ans crumbled it on top of my cooled tarts.so easy and delicious.  There is also a dessert dip that you can make to be posted later.

Nellie & Joe's Key Lime Pie or Tarts

Pre-heat oven to 350degrees
9" graham cracker pie crust or individual ramekins
1-14 oz can of sweetened condensed milk
3 egg yolks, no whites
1/2 c Nellie and Joe's Key West Lime Juice, or the equivalent of fresh Key Lime juice

Combine,milk, egg yolks, and lime juice.Blend until smooth.  Pour filling into a pie shell or ramekins that have been sprayed. Bake for 15 minutes. Remove from oven, and cool on rack 10 min. before refrigerating.  Just before serving you can garnish pie with whipped cream and lime slices, or if you are making the upside down version, top with crumbled graham cracker crust. Enjoy! What is summer without Key Lime Pie!

I have not received any consideration or product the Nellie & Joe's Key West Lime juice, I just like the product, and have used it for many years.


Thursday, July 7, 2011

Best Laid Plans and Peachy Keen Vanilla Fro Cho

This was supposed to be Peachy Keen Vanilla Fro Cho.  I first saw this on Janetha's blog, Meals and Moves and knew that I had to make this.  Our ice cream maker had been lying dormant in the pantry all winter long, and the Fro Cho looked so good. This would be the perfect recipe to resurrect the ice cream maker. I had Vanilla Chobani Greek Yogurt, 2 ripe peaches, peach yogurt, and vanilla bean paste.   I just had to run out and get some FF Half and half. We used honey instead of agave, which we did not have. the freezer bowl had been in the freezer overnight. Now we're ready to make the wonderful vanilla peachy concoction.

We took the freezer bowl out of the freezer, combined the ingredients, per the recipe. then we poured the mixture int our frozen bowl ,which was now inside our Donvier Ice Cream maker.Put the lid on and started to stir.  Immediately, the mixture froze up the sides of the bowl, and as my husband tried to turn the paddle, it broke, as you can see in the above picture. We tried to scrape the mixture out of the bowl, to new avail.  We put the freezer bowl in the fridge to let it defrost, but it was still frozen.  We could only get small bits of the Fro Cho to savor.  We weren't happy campers, except for my solar Smiley Happy Flower, which bobs up and down, and is in the picture.  My dear friend, Becky, gave it to us, and it was the only thing making us happy that night!  If you love yogurt and fresh peaches, you have to try the Peachy Keen Vanilla Fro Cho, and I hope that you have better luck than we did.

Now, we don't have an ice cream maker:)  Has anyone had their ice cream or frozen yogurt mixture free up too fast?  Was it because it was fat free, and we used honey?  Does anyone have any good recommendations for one? Cuisinart?  I do have the Kitchen Aid Stand mixer, so how is the ice cream maker attachment, does it work well?  One plus with the ice cream maker attachment, is I already have the motor from the mixer.  Feel free to tell me how much you do or don't like your ice cream maker. Maybe you need a Happy Flower,  too:)

Monday, July 4, 2011

Red, Blue, and Lemonade Pie Fourth of July

Happy 4th of July to you all. Have a safe and Happy 4th.  The fireworks have been going off in our neighborhood for several nights, so I imagine the finale will be tonight, hopefully.  I'm just glad that  I don't have any small children, that are trying to go to sleep. If I sound like an old lady, I guess that I am.  I like the professional fireworks displays, but not the neighborhood variety, which are just "noise'".

Enough said, I need to soothe my nerves with a slice of frozen Lemonade Pie.  This is the perfect summer dessert, easy peasy, frozen,  creamy, and lemony.  It really only has three ingredients 1 can of frozen lemonade, sweetened condensed milk, and whipped cream, or Cool Whip, all combined in a graham cracker crust, home made or store bought, your choice. I opted for the Cool Whip, to make it more figure friendly,  and made my own graham cracker crust.  You can top with fruit or not.  Maybe just a sprig of mint will do for you. Any way you have this pie, it is a slice of heaven on a 90 degree day, and will certainly soothe jangled nerves.


Lemonade Pie (adapted from Food Network) and  Annie Oakley's Kitchen, formerly Annies Dish

Ingredients

* 1 premade graham cracker crust, or make your own
* 1 (14 ounce) can sweetened condensed milk, chilled
* 1 (12 ounce) container whip topping, thawed
* 1 (6 fluid ounce) can frozen lemonade concentrate, keep frozen

Directions

In a medium bowl, add chilled sweetened condensed milk and cool whip and fold gently. Add frozen lemonade and continue to gently fold. Do not let the mixture become soupy. Pour mixture into the pie crust and freeze overnight.

Garnish with fresh fruit or mint.

Enjoy!

Print friendly